Build and Deploy Sidebar Extensions in the CMS Content Editor : Jess Kaufmann Reed
by: Jess Kaufmann Reed
blow post content copied from Salesforce Developers Blog
click here to view original post
In Salesforce’s enhanced CMS, Sidebar Extensions put productivity tools right inside the content editor where your content creators need them. Sidebar extensions let you add useful features like spell checkers, grammar and tone editors, content recommendation apps, translation services … and anything else you can dream up. With read and write access to your content item properties, sidebar extension let you work and see updates right in the draft.
In this blog post, we’ll walk you through the process of creating a sidebar extension, either to offer on AppExchange or to develop and deploy in your own orgs.
What are Enhanced CMS Workspaces?
Enhanced CMS workspaces are the next generation of CMS workspaces that have been completely revised to provide greater flexibility and extensibility along the entire content lifecycle. The new workspaces provide mature CMS functionality, and they are built on a new API-first, highly flexible and extensible JSON-based content architecture that can scale to B2C-grade websites. For more information about the Enhanced CMS Beta, see Site Search and Enhanced CMS Workspaces (Beta).
You can add as many sidebar extensions to the content editor as your team can use. After you’ve added at least one, you see the extensions panel in the CMS on the right side of the content editor. Content authors can expand and collapse the panel and the extensions within the panel as they work.

Example: Editor extension for text summarization
Let’s see how our fictitious company, Capricorn Coffee, uses Sidebar Extensions.
Capricorn Coffee has many blog articles about their roasting process, coffee growers, and environmental commitments. To benefit readers and help content managers organize and repurpose content, they need an easy way to create article summaries. A text summarizing tool would let content authors quickly create a summary of each article.
Capricorn decides to create a TLDR sidebar extension that works with the TLDRthis API.
Watch a TLDR sidebar extension video demo.
TLDR sidebar extension user experience
With Capricorn’s TLDR sidebar extension, content authors can open a News item in the content editor, and then open the TLDR extension from the panel on the right. They set the parameters that indicate the minimum and maximum word count of the summary, select the source and target fields, and choose the summarization type (human language-like AI summarization, or a selection of key sentences).
![]()
After they click Create Summary, the extension tool runs some quick verifications and pastes a summary into the Excerpt field. The author verifies the summary text, makes a few tweaks as needed, and clicks Save. Now, a content summary is available for this News item.
Beyond TLDR, other extension tools follow a similar flow: grammar or tone checkers make suggestions based on editorial style guides, SEO tools help set and check keywords and meta descriptions, and readability tools evaluate structure and word choice to make sure content is easy to read.
Creating the TLDR sidebar extension
Let’s walk through the process of creating a sidebar extension that works with the TLDR API. First, we’ll create the extension, and then view and test it in the sandbox org.
Prerequisites
1) You’re familiar with configuring and deploying Lightning web components (LWC).
Need a refresher? This Trailhead module covers the essentials: Lightning Web Components Basics.
2) If you’re using this in a Beta developer org, you’ve read the Before You Begin and Beta Limitations sections of the Site Search and Enhanced CMS Workspaces (Beta) documentation.
3) Your dev environment has been prepared according to these instructions: Set Up Your Salesforce DX Environment.
Tip: Easily copy the code samples in this blog post from our CMS Sidebar Extensions repository on Git Hub.
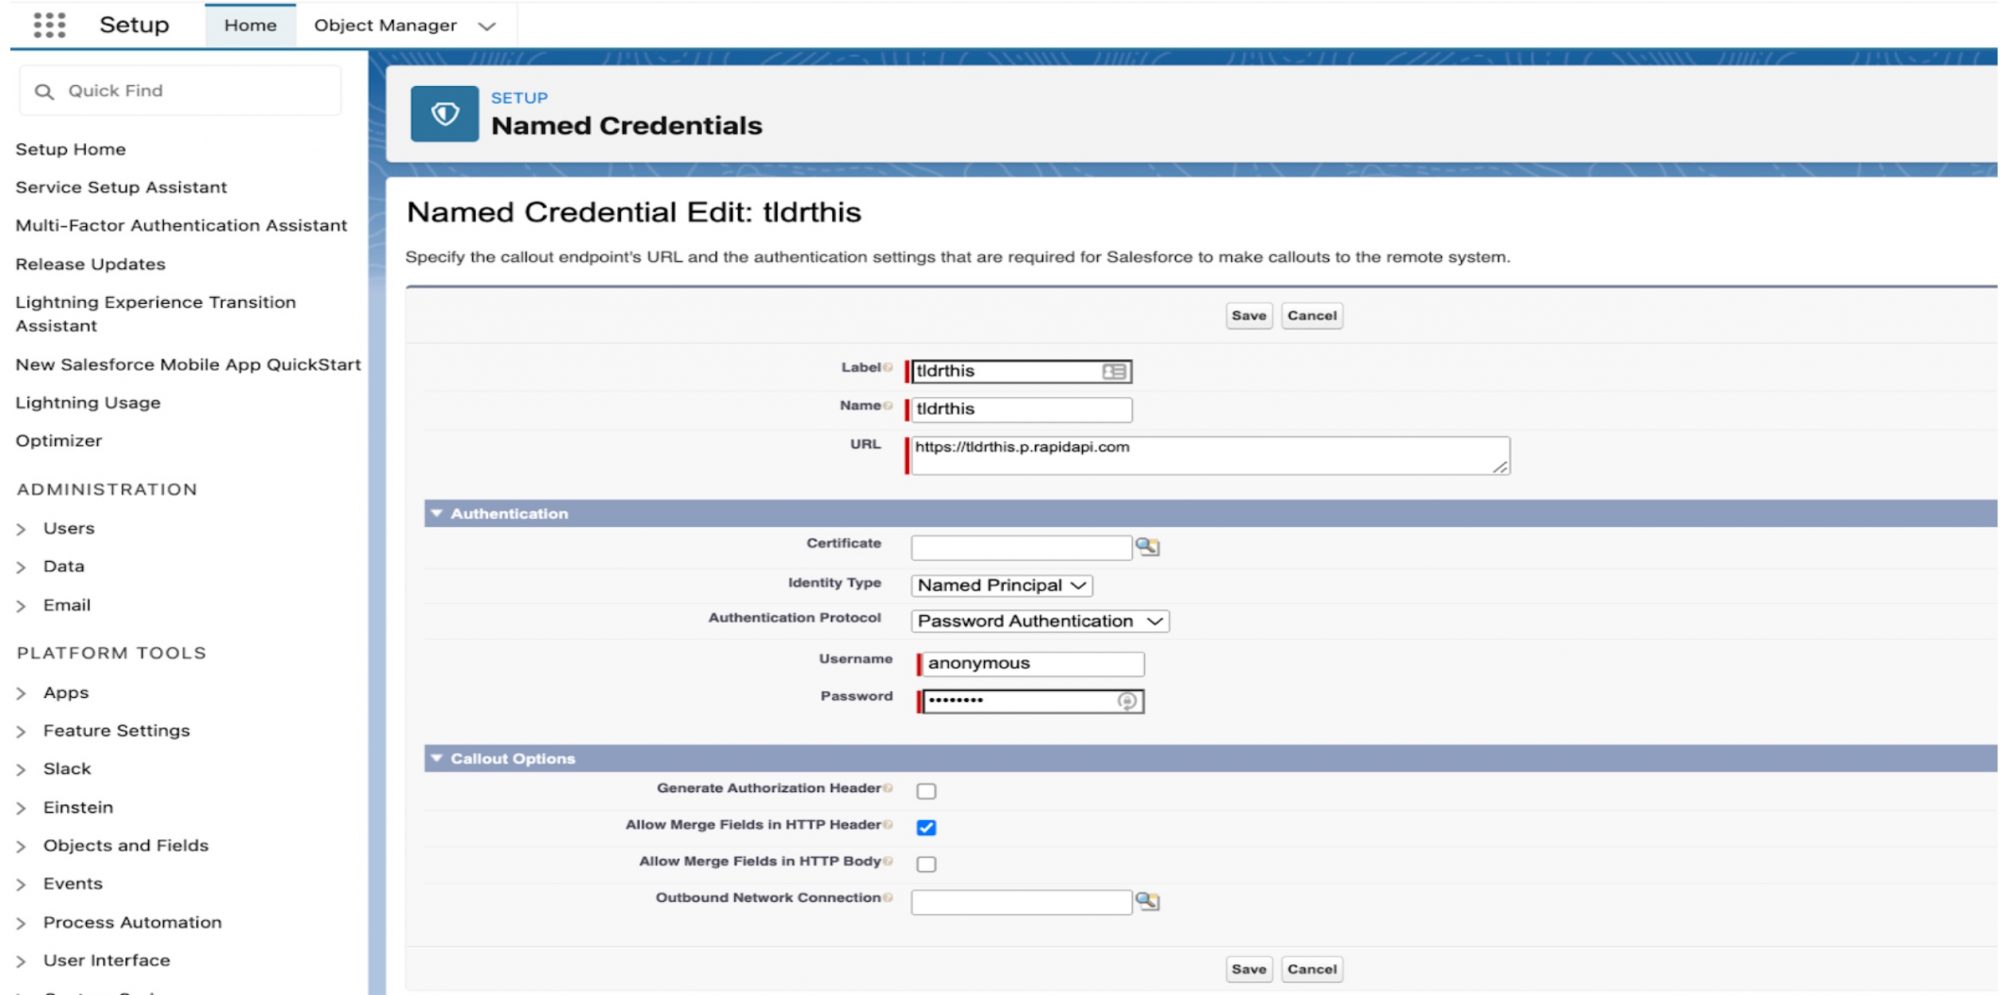
Step 1: Set up named credentials
We recommend using named credentials for the external callout. Enter the following information:
Label: tldrthis
Name: tldrthis
URL: https://tldrthis.p.rapidapi.com
Identity Type: Named Principal
Authentication Protocol: Password Authentication
Username: anonymous
Password: Enter the API key from the tldr summary api
Generate Authorization Header: deselect
Allow Merge Fields in HTTP Header: selected
Allow Merge Fields in HTTP Body: leave deselected
Outbound Network Connection: Optional or Leave Blank
Note: Read more information about named credentials, including defining a named credential and using named credentials as callout endpoints. Learn how to protect sensitive information within managed packages.
Step 2: Set up and secure the callout to TLDR
The first thing you need to do is figure out how the extension will handle the authentication requirements of the destination API. In this example, we’re creating an Apex controller to make an external call using named credentials to the TLDR API. This way you can avoid exposing your API key, especially if you’re using the Fetch API.
public class TldrSummaryExtensionController {
    @AuraEnabled(cacheable=true)
    public static String getSummary(String summaryInputText, Integer minLength,
             Integer maxLength,String apiType) {
       String urlToInvoke = 'AI'.equals(apiType)?
           'v1/model/abstractive/summarize-text/':
       'v1/model/extractive/summarize-text/';
        HttpRequest req = new HttpRequest();
        req.setEndpoint('callout:tldrthis/'+urlToInvoke);
        req.setHeader('content-type', 'application/json');
        req.setHeader('x-rapidapi-host', 'tldrthis.p.rapidapi.com');
        req.setHeader('x-rapidapi-key', '{!$Credential.Password}');//Get your key from TLDR API site
        req.setMethod('POST');
        JSONGenerator requestBody = JSON.createGenerator(true);
        requestBody.writeStartObject();
        requestBody.writeStringField('text', summaryInputText);
        requestBody.writeNumberField('min_length', minLength);
        requestBody.writeNumberField('max_length', maxLength);
        requestBody.writeEndObject();
        req.setBody(requestBody.getAsString());
        Http http = new Http();
        HTTPResponse res = http.send(req);
        return res.getBody();
    }
}
Step 3: Add the remote site setting
TLDR (in this example) or any third-party API used for getting summary should be added to Setup→Security→Remote Site Settings.
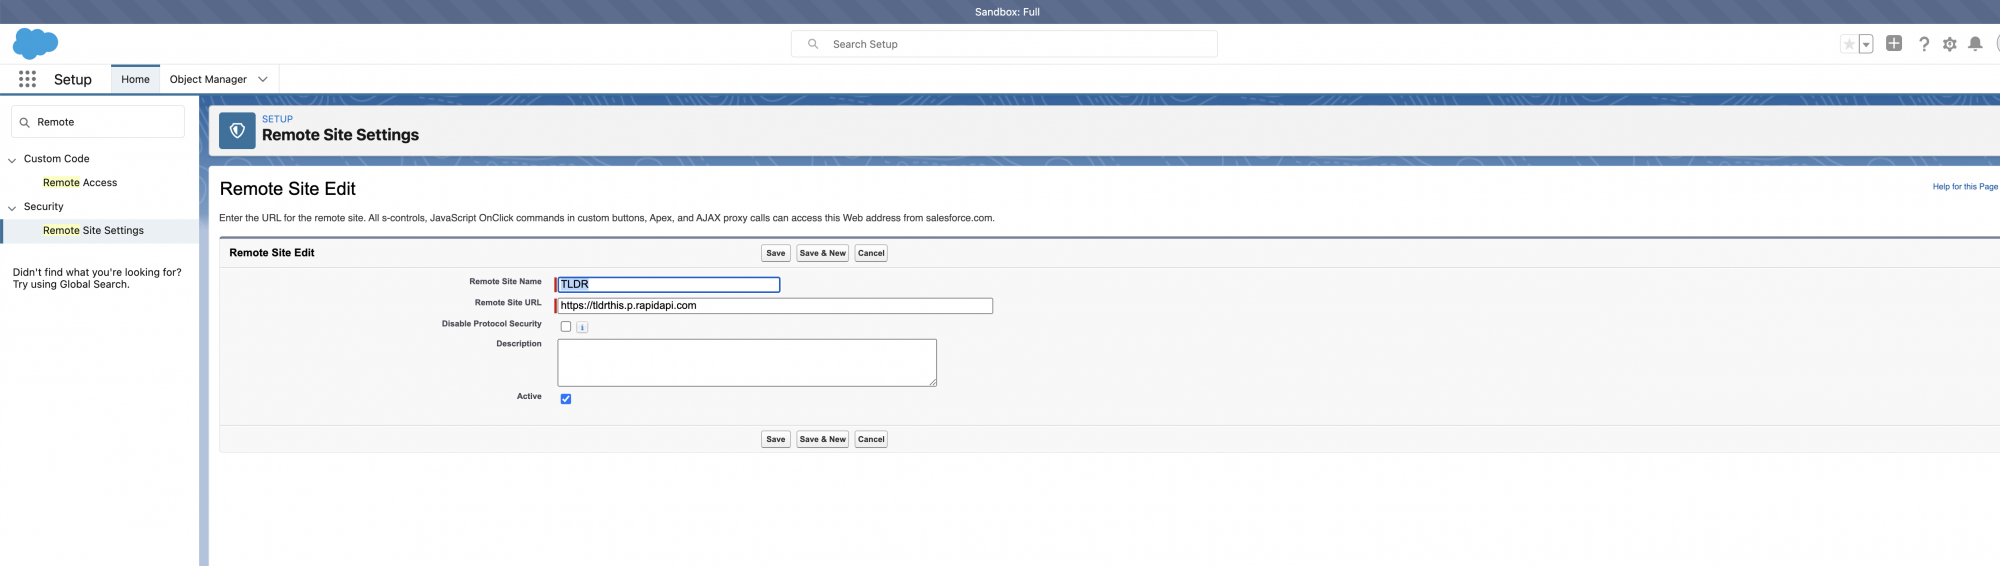
Alt text: A screenshot of the Remote Site Setting setup page
Step 4: Create the JS Meta file for your extension
For your component to appear in the content editor, you need to define the target. Add the target value lightning__CmsEditorExtension to specify the sidebar extension. Consult the LWC developer guide for more information about XML Configuration File Elements.
.js-meta.xml
<?xml version="1.0" encoding="UTF-8"?>
<LightningComponentBundle xmlns="http://soap.sforce.com/2006/04/metadata">
    <!-- The apiVersion may need to be increased for the current release -->
    <apiVersion>54.0</apiVersion>
    <isExposed>true</isExposed>
    <masterLabel>TLDR summary Extension</masterLabel>
    <targets>
        <target>lightning__CmsEditorExtension</target>
    </targets>
</LightningComponentBundle>
Step 5: Create the HTML template for your extension
HTML provides the structure for your extension component.
*html
<template>
    <div class="slds-card slds-var-p-around_x-small">
        <div class="slds-form">
            <div class="tldrIcon">
                <lightning-card variant="large" icon-name="utility:summary">
                    <h6 slot="title"><b> TLDR this</b></h6>
                </lightning-card>
            </div>
            <h6><b>Create a summary for this Content Item</b></h6>
            <!-- Min length used as input param in TLDR Api -->
            <lightning-input type="number" label="Min Length" max="300" min="10"
                placeholder="Enter Minimum length of the output summary" onchange={handleMinLengthChange}>
            </lightning-input>
            <lightning-input type="number" label="Max Length" max="300" min="10"
                placeholder="Enter max length of the output summary" onchange={handleMaxLengthChange}>
            </lightning-input>
            <!-- Choose source field from content to pick up input data -->
            <lightning-combobox name="source" label="Choose source" value={dafInputField}
             options={contentOptions} onchange={handleDafInputFieldChange} required>
            </lightning-combobox>
            <!-- Choose target field from content to populate output data -->
            <lightning-combobox name="target" label="Choose target" value={dafOutputField}
             options={contentOptions} onchange={handleDafOutputFieldChange} required>
            </lightning-combobox>
            <!-- Choose TLDR summary API you want to use -->
            <lightning-combobox name="summary" label="Choose Summarization Type" value={summaryAPIToCall} placeholder="Select Summary Type"
                options={summaryOptions} onchange={handleSummaryChange} required></lightning-combobox>
            <br>
            <lightning-button variant="brand" label="Create summary" title="Primary action" onclick={createSummary}
                class="slds-m-left_x-small"></lightning-button>
        </div>
        <br/>
    </div>
</template>
Step 6: Add the JS code
JavaScript defines the core business logic and event handling of the component.
Note: The experience/cmsEditorApi, referenced below, is specific to the CMS content editor. The wire adapters get the current state of the editor context and content, and the JavaScript API sets the content in the content editor. For a closer look at the wire adapter code that’s used in this extension, see Appendix A of Site Search and Enhanced CMS Workspaces (Beta).
*.js
/*
* Copyright 2022 salesforce.com, inc.
* All Rights Reserved
* Company Confidential
*/

import { LightningElement, api, wire } from 'lwc';
import {
   getContext,
   getContent,
   updateContent
} from 'experience/cmsEditorApi';

import getSummary from '@salesforce/apex/TldrSummaryExtensionController.getSummary';

/**
* This sidebar extension to get summart text using TLDR summary API.
* Please refer https://rapidapi.com/tldrthishq-tldrthishq-default/api/tldrthis used in this example
*/
export default class TldrSummary extends LightningElement {

   // Get the content data through wire adapter using getContent API that will help in selecting the input and output field
   @wire(getContent, {})
   onContent(data) {
       this.content = data;
   }

   //Get context details to get schema details of current content type
   @wire(getContext)
   context;

   //Default paramter values for TLDR summary API
   minLength = 10;
   maxLength = 300;
   summaryAPIToCall = "AI";


   //Source field to pick up data to be summarized
   dafInputField = "";

   //Target field to populate using API
   dafOutputField = "";

   //TLDR Summary Type API value set on selection
   handleSummaryChange(event) {
       this.summaryAPIToCall = event.detail.value;
   }

   get summaryOptions() {
       return [{
           label: 'AI (Human-like)',
           value: "AI"
       },
       {
           label: 'Key sentences',
           value: "KEY_SENTENCES"
       },
       ];
   }

   handleDafOutputFieldChange(event) {
       this.dafOutputField = event.detail.value;
   }
   handleDafInputFieldChange(event) {
       this.dafInputField = event.detail.value;
   }

   // Selection box for current content Fields
   get contentOptions() {
       return this.getCurrentSchemaList();
   }

   //Get schema details or fields of current content selected
   getCurrentSchemaList() {
       let currentContentSchemaList = [];
       const schema = this.context.data.schema.schema.properties
       for (const property in schema) {
           if (this._isTextType(schema[property].$ref)) {
               currentContentSchemaList.push({ label: schema[property].title, value: property})
           }
       }
       return currentContentSchemaList;
   }


   handleMinLengthChange(event) {
       this.minLength = event.detail.value;
   }

   handleMaxLengthChange(event) {
       this.maxLength = event.detail.value;
   }
   /**
    *
    * Create a summary text by calling tldrthis api
    */
   async createSummary() {
       if (typeof this.content.data.contentBody[this.dafOutputField] == "undefined") {
           this.generateSummarizeText();
       } else {
           if (confirm("Summary Target field already has some text in it. Would you like to overwrite it?")) {
               this.generateSummarizeText();
           } else {
               console.log("Target data not modified");
           }
       }
   }

   // Method to pick up Source data -> Hit API and extract response -> Populate the target field
   async generateSummarizeText() {

       var sourceHtmlInput = this.content.data.contentBody[this.dafInputField]
       if (sourceHtmlInput == undefined) {
           alert("Source input empty or not saved");
           return;
       }

       // Remove any html tags that will be present in input data
       const response = await getSummary(
           {
               summaryInputText: sourceHtmlInput.replace(/<\/?[^>]+(>|$)/g, ""),
               minLength: this.minLength,
               maxLength: this.maxLength,
               apiType: this.summaryAPIToCall
           }).catch((err) => {
               console.error(err);
           });;

       try {
           const responseJson = JSON.parse(response);
           if (responseJson?.summary) {
               /**
                *  updateContent API to update the target field within DAF
                * (selected on extension ui) with summary
                *
                */
               //deep clone the contentBody and modify the field/proeprty to push the value in the daf
               const contentBodyModify = JSON.parse(JSON.stringify(this.content.data.contentBody));
               //change the value of user changed field
                contentBodyModify[this.dafOutputField] = responseJson?.summary;
               updateContent({
                   contentBody: contentBodyModify
               }).then(() => {
                   //callback after daf update
               });
           } else {
               console.log('unable to get summary', responseJson?.message);
           }

       } catch (e) {
           console.error(e);
       }
   }

   _isTextType(ref) {
       return (
           ref === '#/$defs/sfdc_cms__textType' ||
           ref === '#/$defs/sfdc_cms__richTextType' ||
           ref === '#/$defs/sfdc_cms__multilineTextType'
       );
   }

}
Final steps: Deploy your code and package your extension
When your code is complete, the next step is to deploy it. We offer different deployment options based on your role and needs as a customer, system integrator, or independent software vendor (ISV) partner. The LWC Developer Guide guides you through your next steps.
ISV partners can use second-generation managed packaging (2GP) to distribute and manage their apps.
Customers and non-ISV partners can create an unlocked package to deploy metadata into their own org(s). When you’re ready to package your extension, follow these instructions for unlocked packages.
Summary
You now have a template for using third-party APIs to create custom components for the CMS content editor. Capricorn Coffee is using their sidebar extension tool to create article summaries. As you think about which of your content workflows could use a boost, consider tapping the power of AI to recommend related content or images. Improve your communications with tone and spell checkers, or create extensions to edit images and translate content right from the content editor.
We’d love to know how you end up using Sidebar Extensions to enhance your content development process.
About the authors
Jagadeesh Mattila is a Lead Member of Technical Staff at Salesforce, based in Hyderabad, India. Jagadesh works on developing and improving the user experience for the Salesforce CMS.
Kuldeep Misri is the LWCDirector of Product Management on Salesforce CMS, working on the next generation of Salesforce CMS content modeling and authoring experiences.
Jess Kaufmann Reed is a Writer for the Salesforce Content and Communications Experience covering the Salesforce CMS.
The post Build and Deploy Sidebar Extensions in the CMS Content Editor appeared first on Salesforce Developers Blog.
August 29, 2022 at 10:00PM
Click here for more details...
=============================
The original post is available in Salesforce Developers Blog by Jess Kaufmann Reed
this post has been published as it is through automation. Automation script brings all the top bloggers post under a single umbrella.
The purpose of this blog, Follow the top Salesforce bloggers and collect all blogs in a single place through automation.
============================

Post a Comment