Salesforce Spring’21 Release Notes/Features : jayakrishnasfdc
by: jayakrishnasfdc
blow post content copied from Jayakrishna Ganjikunta
click here to view original post

Release Overview & Key Dates:
The Release Date for Spring ’21 will be on Jan 16th, Feb 6th, 12th & 13th( The exact date will be depend on your production Instance). If you already know the instance your production Org is located on, you can head over to Salesforce Trust and click on your instance name and hit “Maintenances”, this will show you the date of the Salesforce Spring ’21 release hitting your Org.
Release Notes: 21st Dec,2020
Preview Starts: 8th Jan,2021
Release Window: 15/1 or 6/2 or 12/2 based on instance.


https://releasenotes.docs.salesforce.com/en-us/spring21/release-notes/salesforce_release_notes.htm
The Salesforce Release Notes are moving! Check them out on Salesforce Help! This website will not be accessible after July 2021
Find Release Notes from below..
https://help.salesforce.com/articleView?id=release-notes.salesforce_release_notes.htm&type=5&release=230

here…… I am sharing some of the Release notes which i gone through and Most awaited and favorites
General
- Quickly Find Portal Users When Changing Record Owners
When you want to give a portal user ownership of a record, you now can filter for customer portal users and partner users in the change owner window so you can efficiently find who you’re looking for.

2. Working with Tab-Focused Dialogs
In Lightning console apps, dialogs no longer stop you from interacting with the rest of the UI. This release update limits the focus of dialogs triggered by a workspace tab or subtab to only the tab that triggered it
To activate this release update, from Setup, in the Quick Find box, enter Release Updates, then select Release Updates. For Keep Working with Tab-Focused Dialogs, click Activate.
After the update, when you trigger a dialog, it’s limited to the tab that created it.

3. Streamline Report Creation with Multi-Field Selection
Spend less time creating reports and more on translating results into next steps. Multi-select allows you to drag multiple fields to your reports with a single action. Plus, you can now add or remove fields and columns and preview the results without delay.
Select one or more fields from the Fields panel in the Lightning report builder (1) and drag them to the Columns list in the Outline panel (2) or directly to the report preview. To select multiple fields, press Ctrl (Windows), Cmd (Mac), or Shift when you click.

For the fastest performance when creating reports, we recommend that you disable automatic preview updates (1). But even if you leave automatic preview on, you still get better performance when adding fields, removing fields, and repositioning columns.

4. Get Report Details Emailed in .xlsx Format
Get report exports in the format you want. When exporting a report, you can select .xlsx, .xls, or .csv as the format. Previously only .xls and .csv were supported.
On the Reports page, select the Export row-level action for the report. Click Details Only and then select .xlsx as the Format option.

If security is a concern, you can hide the .xls option by selecting Hide the option to export a report in XLS format in Lightning Experience in Reports and Dashboards Settings.
5. Lightning Page Performance
The ability to analyze Lightning page performance. The previous update provided some high level information about page loads time, but in Spring ’21 the Page Analysis feature will show us predicted load time, as well as performance breakdown by component.

6. Manual Sharing
The “Sharing” button is now available in Salesforce Lightning! Your users will now be able to share a record to a user, or group of users.

7. Create More Roles
In Salesforce orgs created in Spring ’21 or later, you can create up to 5,000 roles. In existing orgs, the default limit hasn’t changed. You can create up to 500 roles and can contact Salesforce Customer Support to increase this limit. Keep in mind that to improve performance, it’s best to set up roles based on data access and eliminate any roles that aren’t needed.
Sales
1.Prepare for Productive Conversations with the Meeting Digest
Salesforce Meetings, gives your sales reps a single page that they can use to gather and share information before a meeting starts. They get insights about who’s attending a meeting, reminders about meeting invitation responses and details, plus related record activity.
When enabled, users see the Meeting Digest tab when viewing an event record.

Reps can review who’s responded to the meeting invite and gather information about who they are (1). If Einstein Activity Capture event syncing is enabled, reps receive visual cues about meeting attendee job titles and roles. With Einstein Activity Capture, they also receive reminders about the event, such as insight into attendees who haven’t responded and missing event details (2). Reps can review the related record’s activity in the activity timeline (3). This activity timeline shows only the activity associated with the record that’s important for the meeting. If Salesforce Anywhere (Quip) is enabled, reps can use the Associated Documents component to take notes and review related documents in Quip.
2. Adjust Your Forecasts on the Go
The Salesforce mobile app now supports forecast adjustments. In the mobile app, you can adjust your own forecasts but not your subordinates’ forecasts. Previously, all mobile forecasts were read-only.

3. Do More with Opportunity Products
Give your sales team more flexibility to track information on opportunity product records. For example, a rep wants to track two delivery locations in a related list for an opportunity product record. Now you can create an object relationship and page layout to make it happen.
In your object management settings, create a lookup relationship between any standard or custom object and Opportunity Product (the OpportunityLineItem object). Make sure that the lookup field and related list are added to the page layouts where you want them to appear.

In this example, the Location custom object has a lookup relationship with Opportunity Product.

Now reps can track the North Beach and Downtown delivery locations on the Monitor product record.
4. Make Sure Emails Get Delivered with Soft Bounce Email Handling
Companies use bounce handling so that their sales reps know when an email doesn’t get delivered. Now you can track an email’s soft bounce, which is a temporary delivery failure. Previously, you tracked only hard bounces, which are permanent delivery failures.
The activity timeline shows a warning to indicate that the email has bounced.

Reps know when their email didn’t reach the recipient. Sending emails to an address that generated a soft bounce sometimes succeeds another time. It’s not necessary to confirm or update the recipient email address, unlike with an email address that generated a hard bounce.
5. Save Time with Duplicate Components in Email Template Builder
Sales reps can now create the perfect email template component and then duplicate it to reuse it. Previously, reps recreated components.
When your component is the way you want it, click the duplicate button.

Move the duplicate component or leave it where it is. Make changes without affecting the original component.

6. Optimize Email Management
Now your reps can find email templates more easily with a renamed set of template choices. My Templates is now My Lightning Email Templates and All Templates is now All Lightning Templates. All Classic Templates hasn’t changed.
It’s easier for users to find the correct template.

Review the old and new names.
| Old Name | New Name | Result |
|---|---|---|
| My Templates | My Lightning Templates | All Lightning and Email Template Builder email templates you created. |
| All Templates | All Lightning Templates | All Lightning and Email Template Builder email templates you have access to |
| All Classic Templates | No change | All Salesforce Classic email templates you have access to |
Services
1. Customize Your Default No-Reply Address for Email Notifications
Email notifications were automatically sent from [email protected]. Now, you can choose which email address your org uses as the default FROM address for certain Case-related notifications, so your customers know that the email comes from your company.
–>From Setup, enter Support Settings in the Quick Find box
–>Turn on Send Case Notifications from System Address.
Configure and verify a default No-Reply address for your org in Organization-Wide Addresses. Then, click Enable Test Run in the Release Update to send email notifications from your selected email address for Case Comment, Case Escalation, Case Assignment, and when an existing case receives emails.
community Cloud => Now Experience Cloud
To better reflect the many types of connected digital experiences you can create—including portals, websites, help centers, forums, and mobile apps—Community Cloud is now called Experience Cloud.
quick summary of the key terminology changes.
| We used to say… | Now we say… | Meaning… |
|---|---|---|
| Community | Site or Experience Cloud site | The site you build in Experience Cloud using either Experience Builder or Visualforce. |
| Lightning community | Experience Builder site | The site you build using Experience Builder. |
| Salesforce Tabs + Visualforce community | Salesforce Tabs + Visualforce site | The site you build using Visualforce. |
| Lightning community template | Experience Builder template | The template you use to build a site in Experience Builder, such as the Customer Service and the Build Your Own templates. |
| Lightning community theme | Experience Builder theme | The theme you use to style your site in Experience Builder. |
| Lightning community page | Experience Builder page | The pages that make up your site in Experience Builder. |
Next, let’s look at the main user interface changes. To access your sites from Setup, in the Quick Find box, enter Digital Experiences, and select All Sites.
The other items in the Digital Experiences menu are also simplified, but all settings and items contained in this area remain the same. And, as appropriate, we replaced community with site or Experience Cloud site in Experience Workspaces, Experience Builder, and other areas of your org.
Security & Access
1. Monitor More Changes in the Setup Audit Trail
To help you track the recent setup changes that you and other admins make to your Salesforce.org, we added new events to the Setup Audit Trail. You can now track changes to Email Relay. Track changes to email relay or record filters set through the Email Delivery Settings page.
2. Users with Standard External Profiles Can No Longer Log In To Experience Cloud Sites
Users with standard external profiles can no longer log in to Experience Cloud sites such as communities and portals.
Users in your org who are assigned to the external standard profiles can no longer log into Experience Cloud sites such as communities and portals. To give access to your Experience Cloud users, clone the standard external profile that they’re assigned to, and change object permissions to meet your business needs. Then assign the cloned profile to the users who access the site.
To still use standard profiles to allow login, enable the Allow using standard external profiles for self-registration and user creation setting in Setup | Digital Experiences | Settings. Enabling this permission is not a Salesforce security best practice.
Find the list of profiles in LINK
3. Standardize Your Salesforce URLs with Enhanced Domains
Include your company-specific My Domain name in URLs across your Salesforce org, including Salesforce Sites and Experience Cloud sites. With no instance names, enhanced domain URLs are easier for users to remember. They also prevent disruption by remaining stable if your org is moved to another Salesforce instance. And enhanced domains meet the latest browser requirements, giving your users the flexibility that they expect.
All options that require you to redeploy your My Domain now are grouped under My Domain Details on the reorganized My Domain Setup page.

Understand the changes that you’re making by reviewing your current My Domain URL (1) and the My Domain to be deployed (3). For customers who can choose a different domain suffix, the Domain Suffix dropdown (2) appears. For example, change your org’s My Domain URL from example.cloudforce.com to example.my.salesforce.com.
After you change your My Domain name or suffix, Salesforce provisions the new My Domain. During the provisioning process, we perform a cursory check to ensure that you have network access to the new domains.

If a new My Domain request or My Domain change is in progress, the My Domain Setup page shows where you are in the process (1). It displays your current and new My Domain login URLs (2), and you can cancel the provisioning process (3).
After provisioning is complete and you log in using your new My Domain URL, the Setup page clearly displays the status.

From here, you can cancel the new My Domain request (1), or you can deploy the new domain (2) to begin using it.
4. See Historical Health Check Details in Security Center
Now you can access more Security Health Check data from the Security Center app. The Security Health Check detail page has a new trend graph to help you scan average Health Check scores for all connected tenants over time. You can also see the last 6 months of Health Check data right from Security Center, saving you clicks and time.
In Security Center, select the Configuration category and click Security Health Check. The trend graph at the top of the page shows the daily average Health Check score for all connected tenants. To see the Health Check settings for a specific tenant on a specific day, enter a date in the date picker (1). Select a value in the Health Check Score column (2), then review the Health Check settings for that tenant on that day (3). Historical Security Health Check information is available for the previous 6 months.
5. Spotlight Change with Improved Detail Page Charts
The new Daily Changes chart overlay offers a clearer view of metric changes for each day. Now you can easily see when changes happened on specific days.
The Daily Changes view is available for all metrics in the Permissions category and all Configuration metrics except Security Health Check. Daily Changes is automatically enabled. You can hide and redisplay Daily Changes or Trend graphs by clicking the Daily Changes and Trend boxes.

Admin & Developer
- Use BatchApexErrorEvent Triggers to Monitor ISV Applications
Include BatchApexErrorEvent triggers in your managed package to monitor the health of batch jobs and take necessary corrective action without any post-installation steps.
The BatchApexErrorEvent object represents a platform event associated with a failing batch Apex execution. To fire this platform event, a batch Apex class declaration must implement the Database.RaisesPlatformEvents interface. A BatchApexErrorEvent platform event is fired when a batch Apex job encounters an unhandled exception. For more details, see Firing Platform Events from Batch Apex in the Apex Developer Guide.
2. Flag Invocable Apex Methods That Make Callouts
For invocable actions that perform callouts, you can now add a callout attribute to the invocable Apex method annotation. With this information, a flow calling the action knows how to manage the transaction at run time.
To flag callouts in Apex methods annotated with @InvocableMethod, add the callout attribute to the annotation and set it to true.
@InvocableMethod(callout=true, label=”My Action Label”)
If your action makes a callout, set the callout attribute to true. If the action is executed by a flow, at run time the flow determines how to successfully execute the action, in a new transaction or in the currently running transaction.
If the callout attribute is set to false, the action is flagged to safely perform in the transaction regardless of whether the transaction has uncommitted work.
3. Create Scratch Orgs with More Features
Now you can add more features to your scratch org definition file.
https://releasenotes.docs.salesforce.com/en-us/spring21/release-notes/rn_scratch_org_features.htm
4. Configure the User and Batch Size for Your Platform Event Trigger
Automated Process system user with a batch size of 2,000 event messages. Configuring the user and batch size enables you to bypass some limitations that sometimes arise from using the defaults. For example, record system and OwnerId fields are populated as the specified user. And setting a batch size smaller than 2,000 can help avoid hitting Apex governor limits.
This example shows the configuration of OrderEventTrigger using Metadata API. The user is set to [email protected] and the batch size is 200.
<?xml version="1.0" encoding="UTF-8"?>
<PlatformEventSubscriberConfig xmlns="http://soap.sforce.com/2006/04/metadata">
    <platformEventConsumer>OrderEventTrigger</platformEventConsumer>
    <batchSize>200</batchSize>
    <masterLabel>OrderEventTriggerConfig</masterLabel>
    <user>[email protected]</user>
    <isProtected>false</isProtected>
</PlatformEventSubscriberConfig>
5. Changes in System Namespace
Obtain a map containing all custom metadata records or a single record sObject for a custom metadata type.
Use the new Apex getAll(), getInstance(recordId), getInstance(qualifiedApiName), or getInstance(developerName) methods to retrieve custom metadata type records.Example:
This sample returns a single record sObject for the custom metadata type named Games_mdt with record ID specified as m00000000000001.
Games__mdt mc = Games__mdt.getInstance('m00000000000001');
Convert an 18-character Id value to a 15-character case-sensitive string.
Use the to15() method in the System.Id class. This method uses the case-sensitivity checksum in the 18-character Id value to fix any mangled casing and returns a 15-character case-sensitive string.Example:
String Id_15_char = '0D5B000001DVM9t';
String Id_18_char = '0D5B000001DVM9tkAh';
ID testId = Id_18_char;
System.assertEquals(testId.to15(),Id_15_char);
VERSIONED BEHAVIOR CHANGE: From version 51.0 onwards, the format() method in the System.String class supports single quotes in the stringToFormat parameter.
The String.format() method supports single quotes in the stringToFormat parameter and returns a formatted string using the formattingArguments parameter. In version 50.0 and earlier, single quotes weren’t supported.
VERSIONED BEHAVIOR CHANGE: From version 51.0 onwards, the hashCode() method in the System.System class returns the same hashCode for identical Id values.
In version 50.0 and earlier, identical Id values didn’t always generate the same hashCode value.
6. Lightning Flow Updates
Lightning Flow has now been renamed to Salesforce Flow.
1. Get prior value of the record.

2. Add time dependent actions in record triggered flow type
3 . add multiple columns in screen flow element( this is very much needed). Beta version.

7. SOQL Improvements
Salesforce Object Query Language (SOQL) now makes it easy to include pre-defined groupings of fields within a query statement using the new FIELDS() function. In previous versions of SOQL, retrieving fields meant specifying all the names of all the fields you wanted to retrieve. The new FIELDS() function lets you select all the fields without knowing their names in advance. This eliminates the need for a round-trip to the server to prepare a SOQL statement, eliminates the need for research and a lot of typing, simplifies query statements, and makes it much easier to explore the shape of your objects.
Use FIELDS(ALL), FIELDS(STANDARD), or FIELDS(CUSTOM) in your SELECT statements.
For example, “Select FIELDS(ALL) from Account Limit 200 ;”
8. More filters on Dynamic Actions
Assign actions in the Lightning App Builder instead of the page layout, and apply filters to control when and where actions appear for users.
To add an action in any of the dynamic actions scenarios, click Add Action (1) in the properties pane. In the Actions modal, choose an action and click Add Filter (2) to assign visibility rules based on record field, device type, and other filters. An eye icon  (3) next to an action’s name indicates that visibility rules are applied. If you migrated actions from a page layout, you can modify them in the Actions modal.

9. Access Custom Metadata Type Records Using Static Methods
Use the Apex getAll(), getInstance(recordId), getInstance(qualifiedApiName), and getInstance(developerName) methods to retrieve information from custom metadata type records faster. These methods don’t rely on the SOQL engine and return the sObject details directly from the call.
The following example uses the getAll() method. The custom metadata type named Games has a field called GameType. This example determines if the field value of the first record is equal to the string PC.
List<Games__mdt> mcs = Games__mdt.getall().values();
boolean textField = null;
if (mcs[0].GameType__c == 'PC') {
   textField = true;
}
system.assertEquals(textField, true);
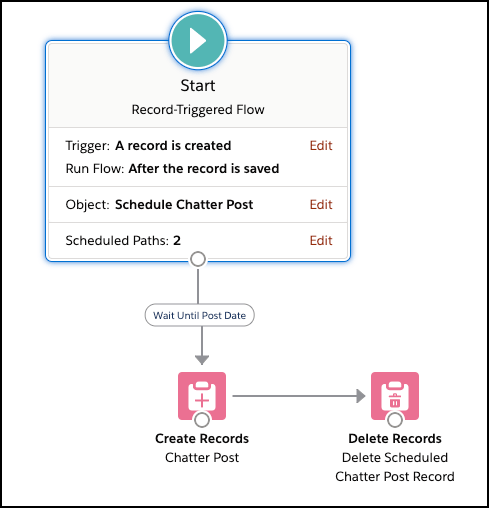
10. Run Part of a Record-Triggered Flow After the Triggering Event
Release Updates/Retirements
Please refer also releases updates that improve the performance, logic, security, and usability of Salesforce and retired information in below link…
https://releasenotes.docs.salesforce.com/en-us/spring21/release-notes/rn_ru.htm?edition=&impact=
Thanks for Reading……
JAYA KRISHNA
Facebook Page: Jayakrishna sfdc Blog – https://www.facebook.com/groups/615517438930811/
Twitter: https://twitter.com/jayakrishnadoc
Blog/website: https://jayakrishnasfdc.wordpress.com
December 27, 2020 at 10:18PM
Click here for more details...
=============================
The original post is available in Jayakrishna Ganjikunta by jayakrishnasfdc
this post has been published as it is through automation. Automation script brings all the top bloggers post under a single umbrella.
The purpose of this blog, Follow the top Salesforce bloggers and collect all blogs in a single place through automation.
============================

Post a Comment